
Overview
NOTE: This guide is based on WHMCS 8.
The Webuzo team has built a WHMCS Hook which makes use of the Webuzo SDK to automate the following tasks thus allowing the webhosts to setup/automate their VPS Offerings :
- Install a Requested Script (E.g WordPress, Joomla, Magento, etc) when a VPS is ordered.
- Issue License to your newly created VPS on which Webuzo is installed using the NOC API.
- Auto-configure Webuzo on your newly created Webuzo (Automate the Initial Webuzo Configuration Step i.e. create the Primary Domain and the Webuzo User account)
- This runs in the background and you don't have to wait till the VPS comes online.
Note : This hook will work with Virtualizor, SolusVM and OnApp.
Requirements
1) A VPS Control Panel like Virtualizor / SolusVM / OnApp
2) WHMCS configured to create VPS on your VPS control panel.
Steps In Short
1) Configure the Products and Services related to the VPS Control Panel.
This can be done under Setup >> Products/Services >> Products/Services
Guide: http://docs.whmcs.com/Products_Management
2) A VPS template that has Webuzo installed and can be used as the Base Template while
creating the VPS when it is ordered.
Note: Template Name should contain "webuzo" so that this WHMCS Hook can identify the Webuzo template easily.
e.g.: centos-webuzo-x86_64.tar.gz
Guide: http://www.webuzo.com/docs/developers-api-cli/creating-a-os-template
3) Add the following Webuzo WHMCS Cron to run every minute which will check if a newly ordered VPS has started
completely and perform the operation you have specified (configure and install Webuzo).
* * * * * php /path/to/whmcs/includes/hooks/webuzo_cron.inc (From Hosting Panel)OR
You can set the cron manually in /etc/cron.d/webuzo_automation
* * * * * USER php /path/to/whmcs/includes/hooks/webuzo_cron.inc (Where USER is user you want to run this cron)Note : This cron does not require any root privileges.
Upload The WHMCS Hook
Please download the hook file : whmcs-v3.zip
Once you have downloaded the file : whmcs-v3.zip file to your computer you need to extract the files using your favorite zip extraction program. Upload the contents of the whmcs folder to /path/to/whmcs/includes/hooks/ i.e the server where WHMCS is installed.
Setup Webuzo WHMCS Hook
Edit the file webuzo_conf.php which contains the Webuzo configuration parameters. These parameters are required to manage the licenses, language strings, list of products, etc.
Here is a quick short list of parameters:
1) $conf_webuzo['noc_username'] = 'example';  // Webuzo NOC Username
2) $conf_webuzo['noc_password'] = 'example'; // Webuzo NOC User Password
3) $conf_webuzo['product_id'] = array(); // List of Webuzo installed Template ID (Only for "ONAPP")
4) $conf_webuzo['fields']['Script'] = 'Script Name';  // If You want to give custom names to the Custom Fields (E.g "Script")
5) $conf_webuzo['custom_fields']['site_name'] = 'Site Name';  // Add any Custom Fields that you want users to fill in
Note : Complete list of parameters is given in the file webuzo_conf.php
Editing The Product/Service
Now login to your WHMCS Admin Panel.
This guide assumes you have already setup WHMCS Product to create VPS automatically.
Navigate To Products/Services
- Once the webuzo_conf.php file is loaded with all the required configuration details, we require to setup certain Custom Fields to handle script selection, Webuzo auto-configurations, script details, etc.
- Edit the Product/Service (of the VPS plan) for which you wish to setup auto-provisioning of Webuzo. This can be done under WHMCS Admin Panel on the Top Right Corner click on Settings Icon >> System Settings and then click on >> Products/Services
- Click on the Edit Product Icon inline to the Product for which you wish to setup Auto Installation.


Setup Custom Fields
- Click the Custom Fields Tab under the Product/Services Menu which will list the available Custom Fields related to the VPS Creation Module setup.
- Scroll Down to add the Custom Fields (required by Webuzo WHMCS Hook) right after the Add New Custom Field label.
- Only one Custom Field can be added at a time. So click on "Save Changes" every time you Add/Edit a Custom Field which will show up another Custom Field to add.
- The following Custom Fields are proposed for the Webuzo WHMCS Hook. A complete list of Custom Fields can be found in the file "webuzo_conf.php"

Note : Specify "none" as the First Option in the List of "Scripts". If users don't want to install any script when their VPS is created rather just install Webuzo, they can choose "none" to refrain from installing any script.

Note : The Apps field will allow users to choose the Apps to be installed on the new Webuzo server. e.g. A user could choose whether to have LEMP or a traditional LAMP stack or maybe even Java. The available apps can be controlled by the Admin.


Note : Fill in the Fields Names as per the Images above. IF you wish to modify the Field Names (e.g. "Admin Username" instead of "Admin Name") then the file "webuzo_conf.php" should contain the corresponding string value for the respective Custom Field.
List Of Custom Fields
Here is the list of Custom Fields available for the developers:
| Field Name | Field Type | Tick Box | Requirement | Description |
|---|---|---|---|---|
| Script | Drop Down | Show on Order Form, Required Field | Compulsory | List of script you want to install separated with , (comma) and none for no script to install. If you have selected none as a script to install then Webuzo will not be configured. You can also specify Apps alongwith the script (seperate them with ; - semi colon) in the comma seperated values and give it a nice name (with a | - Pipe). e.g. wordpress;app:LAMP|WordPress and LAMP. This will appear as WordPress and LAMP. Please note that Apps will require the app: prefix. Also defining Apps with scripts is optional and can be defined as follows as well. |
| Apps | Drop Down | Show on Order Form | Optional | This is to be used if you want the user to choose App(s) not preset with the Script above. List of Apps you want to install separated with , (comma) and none for no Apps to install. You can also specify multiple Apps (seperate them with ; - semi colon) in the comma seperated values and give it a nice name (with a | - Pipe). e.g. LEMP;git|LEMP and Git. This will appear as LEMP and Git |
| Webuzo Status | Text Box | Admin Only | Compulsory (only if configuring) | This field will be used by Webuzo to track the status of the VPS. It is Compulsory if you are Configuring Webuzo / installing any script else Optional. |
| Webuzo User | Text Box | Show on Order Form | Compulsory (only if configuring) | Name for the Webuzo Account. It is Compulsory if you are Configuring Webuzo / installing any script else Optional. |
| Webuzo Logo | Text Box | Admin Only | Optional | Logo for the Webuzo Account. It is Optional. |
| Webuzo Language | Text Box | Show on Order Form | Optional | Language for the Webuzo Account. It is Optional . The list of Languages with webuzo are : bulgarian,dutch,english,french,german,hungarian,italian,japanese,portuguese,russian,spanish,turkish |
| Site Name | Text Box | Show on Order Form | Optional | Site Name for the Webuzo Account. It is Optional. |
| Admin Name | Text Box | Show on Order Form | Optional | Name for the Script Admin Account. If not present, the Webuzo User will be used instead. |
| Admin Password | Text Box | Show on Order Form | Optional | Password for the Script Admin Account. If not present, the Webuzo Password will be used instead. |
| Directory | Text Box | Show on Order Form | Optional | Directroy where Script is going to install. Script will be installed on main domain if the field is missing. |
Additional Custom Fields
- You can also setup the additional fields for optional parameters like Site Description, Site Name, etc. Continue adding the fields as per your requirement.
- The file "webuzo_conf.php" holds the reference to these Custom Fields in a "key => value" format. The key will be the name of the field in the "install.xml" file of the script.
For example if you want to add the Site Description field for WordPress follow the below steps:
1) Go to /var/softaculous/wp/install.xml
2) Search for the site name field, you will get the following code:<input type="text" name="site_name" size="30" value="My Blog">
</input>
3) The key for $conf_webuzo['custom_fields'] will be the name of the input tag i.e. site_name
4) The value for $conf_webuzo['custom_fields'] will be the Custom Field name that you provided in the WHMCS product setup in this case Site Name.
5) The additional field is now setup.

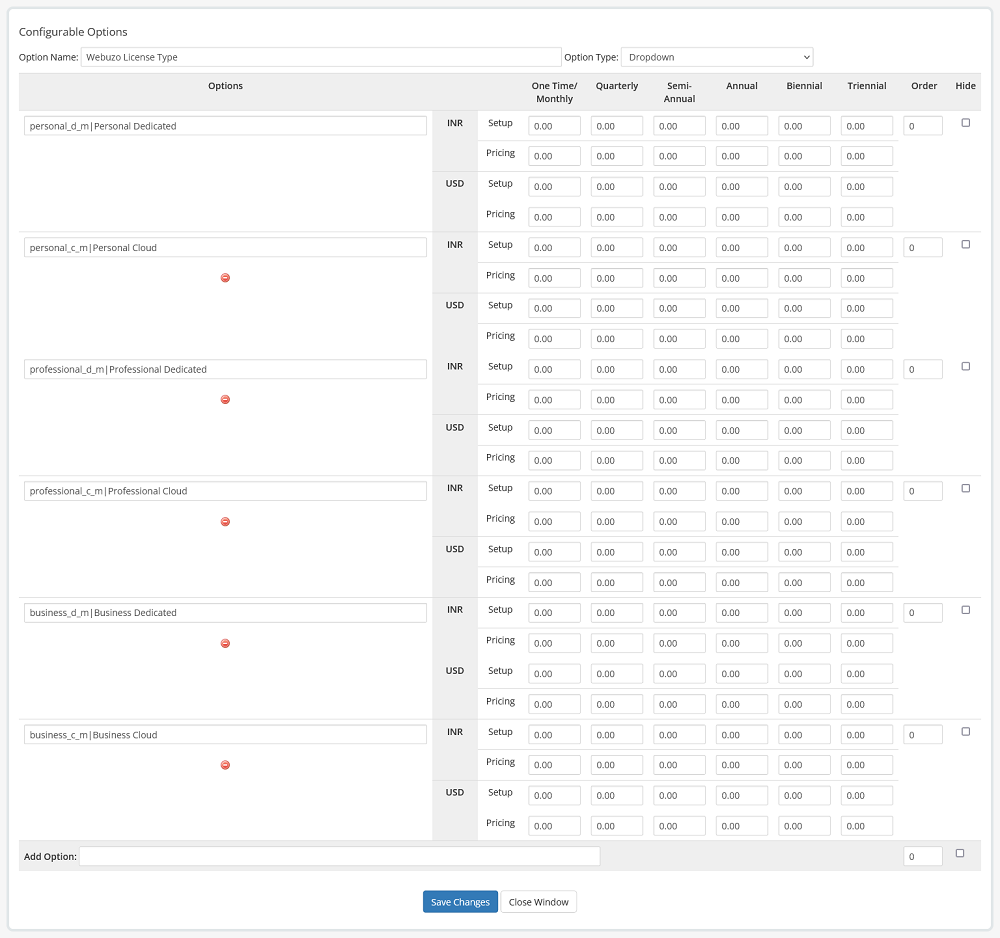
Setup Configurable Options
This step is OPTIONAL. By default the Webuzo license issued for VPS created is Personal Cloud License (1 user). If you would like to issue any other license you can create a Configurable Option with the name Webuzo License Type and the possible values are listed below.
Webuzo License Type
Values :
personal_d_m|Personal Dedicated (1 User Account)
personal_c_m|Personal Cloud (1 User Account)
professional_d_m|Professional Dedicated (15 User Accounts)
professional_c_m|Professional Cloud (15 User Accounts)
business_d_m|Business Dedicated (Unlimited User Accounts)
business_c_m|Business Cloud (Unlimited User Accounts)
Note: You can change the values in Configurable option after | as per your preference as it will appear on the order forum to the customers.
Check the below screenshot of the Configurable Options.
Setup Cron
Add the following Webuzo WHMCS Cron to run every minute which will check if a newly ordered VPS has started
completely and perform the operation you have specified (configure and install Webuzo).
* * * * * php /path/to/whmcs/includes/hooks/webuzo_cron.inc (From Hosting Panel) OR
You can set the cron manually in /etc/cron.d/webuzo_automation
* * * * * USER php /path/to/whmcs/includes/hooks/webuzo_cron.inc (Where USER is user you want to run this cron)Note : This cron does not require any root privileges
Verifying The Setup
You can test the setup by making a DUMMY Order and going to the settings of that order. For debugging purposes upload "softaculous_debug.php" file (to be able to see error messages, if any) in the /path/to/whmcs/includes/hooks/ directory.

Creating Account/Order
Make sure the "Webuzo User" and "Webuzo Password" are setup and the desired script is selected e.g. WordPress

Then click on the "Create" button to create the account on the server.

Troubleshooting
There could be several reasons for the Hook Not to work :
- A firewall is blocking requests
- Incorrect Field Names supplied
- cURL is disabled in PHP
You can check the System Activity Log under the Top right corner
 setting Icon >> System Activity Log
Support
If you need any assistance then please contact the Webuzo Team.
Please send us a screenshot of the Order Form and the Custom Fields you added to the Product.
Email: sales@webuzo.com